
I get a lot of questions about it, every time I submit a picture done with an Infra Red filter, so I thought of Putting together some Information about it.
I'll be happy to answer questions about it, If I'll know the answers.
In General
Well, a few words about Infrared. I will not get too techniqual cause it's not my strong side, just a few words about it.
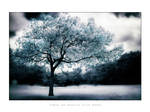
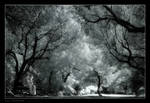
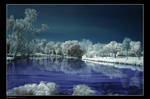
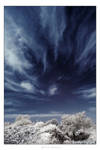
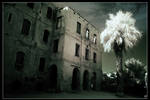
Infrared photographs show a kind of thermo effect. Trees with white leaves and luminous white clouds against colored skies are the most common use for it.
The Infrared opens a window on a parallel world intriguingly different to the one we usually see.
We can't see Infrared light without the filter, we can only see it when It's isolated. Infrared photography is often confused with thermal imaging. It's not, It's just shows an effect similar to that. The difference is basically one of wavelength of electromagnetic radiation.
The filter shows the object because the sun (or some other light source) shines infrared light on it and it is reflected or absorbed by the object. You could say that this reflecting or absorbing of infrared helps to determine the object's color in a four-dimensional colour space made up of blue, green, red and infrared.
Camera and filter
If you are using film camera, I won't get into this.
Digital cameras don't work evenly with IR filter.
Digital sensors have a special infrared-blocking filter in front of the light-sensitive CCD array, as the IR light degrades the visible-light image quality. The question is how much of infrared will the filter let through.
There are a few great digital models like the Sony 717, The Olympus C-2020z, Minolta Dimage 7, and the canon G1 (the G2 is great too).
Among the DSLR the Nikon D70 is best option right now.
Check out more about the Infrared sensitivity here www.jr-worldwi.de/photo/index.…
Of course it's much harder working IR with DSLR, since you have no preview of the result, and it's impossible to see anything through the viewfinder, with the filter attached. I'll get to this later (In technique).
The filter I use is Hoya R72.
There are several others that get good results, but this one gets the classic color effect in the best way possible.
You can test your non DSLR camera for IR photography
Use the "TV remote test" to determine if your digital camera is sensitive to infrared light. Television remote controls use infrared light to turn the TV on and off and to change channels. Aim your TV remote control at the lens of your digital camera from a few inches away, push a button on your remote, and view the image on the LCD panel (not the optical viewfinder) of the camera. If you see a white flash of light coming from the TV remote on your camera's LCD screen, you've just determined that your camera is infrared-sensitive. Now all you need is one specialized piece of equipment, and you're ready to begin making infrared pictures.
Technique
Tripod - Besides your digital camera and filter, a tripod is an absolute necessity since exposures through the infrared filter should be long. For long exposures, some cameras will automatically fire the flash to light the scene, because the camera's "brain" thinks its dark. But you don't want to use flash. Be sure to turn off the flash so the camera will make the exposure by infrared light.
Iso settings - Work in low Iso (50-200) so you won't pick up too much noise.
Camera function - Work in fully Manual (if possible) to get a good light reading from the camera, so You'll know if you are using a long enough exposure.
Set White Balance - You will have to measure the white balance yourself. That's the secret of getting a good color balance in IR photography (with digital photography). Measure the WB in 'PRE' condition with your filter ON from something green as green grass. That would get you the right balance. Test the result, and if needed, try measuring it again.
Composition - To begin, photograph a daylight scene in auto WB. Mount your camera on the tripod and compose the shot normally (Take the widest angle possible for a landscape shot) without the infrared filter over the lens, and make a normal, color picture. The color picture will be a "reference" picture. You might want to combine it with the infrared picture for creative effect later.
Final steps - After you composed it, and focused it, in the color version, take it out of Auto focus. Mount the filter carefully, so you won't destroy the camera position and composition. Switch your WB to the pre position (that you measured earlier). Now, shoot a second picture in exactly the same way except go through the infrared filter. With the infrared filter on the lens, you'll see the infrared effect on the camera's LCD viewing screen (or only in the result in DSLR cameras). The image will appear dark and a monochromatic red-pink in color. This is normal for an infrared picture. After you shoot the picture, you should review the image on the camera's LCD screen and check for proper exposure. If the image is dark, you might want to switch the camera to manual and increase the exposure.
Postprocessing
Once you've captured your infrared images, you'll want to do a little clean up in an image-processing program like Photoshop. When you open the infrared image file, you'll probably see a monochromatic red-pink image that might be a little bit dark. You may want to adjust the curves or levels to brighten the image. Also, you may want to adjust the contrast to your liking. By Now you have an image very similar to one shot on infrared film, but without the hassles.
I usually love to change the channels, to replace the red with a blue.
In Photoshop go to Image>Adjustments>Channel mixer you will first see the setting to the red channel. The red is on 100 and the green and blue are on 0. Turn the red to 0 and the blue to 100.
Now go to the blue channel (the top dropdown menu in the message box). Turn the red to 100 and the blue to 0.
The channels have switched and if you want a better balance change the settings a bit.
If the 'Whites' are a bit 'Reddish', you can go to Image>adjustments>Hue/saturation and lower the saturation of the red (and yellow) channel.

That's the IR story in short.
Photography by the "invisible" light of infrared can open a new world of artistic expression. I love it, and I hope you do too
Feel free to add from your own experience, add tips, and ask questions.
Again, I'm not sure I'll be able to answer all, But I'll try.
Good Links: www.cocam.co.uk/CoCamWS/Infrar… www.apogeephoto.com/mag1-1/mag… And a wonderful galley to enjoy www.photo.net/photodb/folder?f…
Yours, G